Wednesday, April 24, 2013

Card Challenges: no stamps and shapes

Card Challenge: No Stamps


This weeks challenge was to create a card without using stamps. Wow this was harder than I thought it would be! The sentiments I printed off with my printer. I really need to do that more! I usually limit myself with just the sentiments that I have in my stamp collection, but printing them opens things up to unlimited possibilities! I'm making it my personal goal to use my printer more! 

To make the pinwheel on this card I used the small pinwheel die from Lil inker designs, in my big shot. I also used Echo park paper for this card.


Card Challenge: Shaped Cards


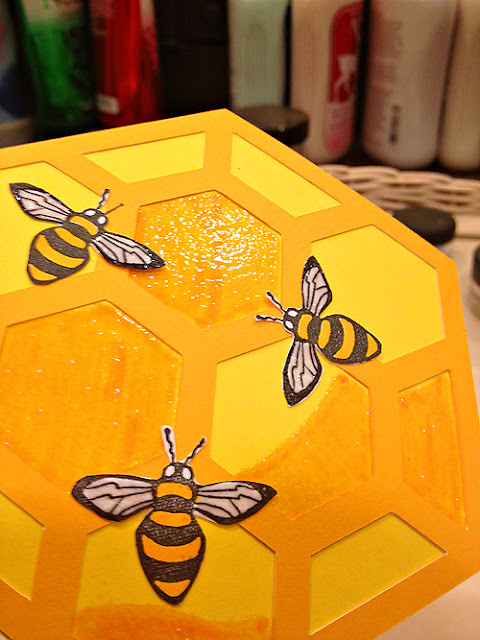
This weeks challenge was to do a shape card. The only rule is that it couldn't be a square or rectangle. For this card I used the shape Hexagonal geometric background, Shape #19760, in the silhouette store.  


I colored some of the cells with markers and then used an embossing pen and clear embossing powder to make it shiny and more like honey. I also clear embossed the bees' wings.


The inside is embossed with a darice embossing folder border and the sentiment is a old retired stamp from stampin up


Pardon the wonky colors on this one! I took a phone pic on my bathroom vanity table before I left the house to deliver it, and the lighting seems to be kinda weird in there for photos. lol! I used "fish in bowl, # 38438" for the bowl, and "fish in bowl, #39243" both in the silhoutte store. I glued cute little googly eyes on the the little fishy :) I had chosen the sentiment "best fishes" for this card.

Tuesday, April 23, 2013

Finally Copics!


I FINALLY jumped on the copic band wagon! I'm so excited! Here's a list of the copics I hand picked to be my starter set. I wanted some of each color family, so I would not be limited on images that I can color, but I didn't want the prepackaged sets either. I wanted colors that I know that I would love, and would be used often. So I researched long and hard. I used both pinterest and google images, looking at other peoples copic projects, and decided what I liked best. Most cards and projects online have the recipe listed of what colors they used to create the image. This was very helpful! I started seeing patterns in the colors that I liked and that made it a lot easier. Once I found a trio I thought I liked, I googled just the copic code numbers, and that brought up images that listed those colors. That pretty much confirmed what I wanted. So here's what I picked for my starter set. (click to enlarge)


If you'll notice, I'm a little short on greens and oranges (yellow reds, YR) and heavier on the yellows. That's because I will use some of the yellows for my green and orange blending combinations. It all evens out. Also, the first set of browns (earthtones, E) are my skin tone blenders. 

Now that I have all these copics, I needed a place to put them! I have found several different ways to store your copics. I knew that I wanted to store them horizontally, and I LOVE homemade storage ideas, so when I was in the hardware store I decided to grab a peice of $8 drain pipe so that  I could have something right away. So here's my current copic storage.....


Wow, my collection looks kinda puny all spread out like that huh. lol! Must buy more copics!!


It was so ridiculously EASY!!! I had the hardware store cut the 12 foot pipe in half (they used a hand saw) so that I could get it into my car easy. Then at home I had my hubby cut them into 5 1/2 inch pieces, and then just glued them together. THATS IT!!! There are plenty of pieces left to add on later too! CHEAP AND EASY, the way I like it! I am going to sit these on a small shelf on my wall right in front of my scrap desk so they will be eye line height. Otherwise I would glue a foam board back on to it. 

Now I did not come up with this idea, I always give credit where credit is due. I found this idea on this blog HERE. So go check out her blog and see how she spray painted hers, not to mention her more impressive copic collection! ;) I will get there! 

Tuesday, March 19, 2013

Review: Papertrey Stamps

Ok, I may have been living under a rock, but I just got in my very first stamp set from Papertrey. See I started my stamping habit with Stampin up, and basically was a loyal customer for years and years. Now there are all kinds of stamp companies out there, and I am ready to try them out! Problem is, it's hard to know just who and what is out there, so I'm here to help you out :)

I have been coveting the Friendship jar stamp set for a little while now. Just look at my pinterest board. lol. It took me some time to find out WHO actually made the set (and what it was called) Once I found them I HAD to have one! (or two or three!) After I purchased it, I then saw all the filler sets that they had to go with it!! AHHH! So guess what my next papertrey purchase will consist of ? ;)

I was happily surprised yesterday with their quick shipping. When I opened the box, I GASPED! It's the most pretty packaging I've ever seen for stamps! I new right away I had to blog about it :) lol!


I was happy to see that it came in this cute clear plastic box. The stamps were all shiny and new, it's going to be painful to apply the first inking! But wait! whats that inside??


A CD case! I was VERY happily surprised to see that it was packaged with a new CD case for storage! (and NO! it is not cracked! that star burst pattern you see at the bottom of the case is actually a reflection of one of my chandeliers I have hanging above me! lol, sorry about that ) 


Clean shiney new stamps! Ahhhhh!!


The stamps are covered in a plastic film to protect from dirt


Lookie here! In the top of the box I found directions and LABELS! 


The surprises just keep coming! These labels go out the OUTSIDE of the CD case to show the inventory of the case AS WELL AS where to place the stamps to ensure they all fit!! 


The label also includes a strip for the spine of the cd case! I sliced that off with my cutter and applied directly to the spin like so.....


Then Applied a label to each side of the case, since this set had a bunch of stamps!


The inside of the case with the labels attached


Now its time to peel off the stamps from the travel sheet


As soon as I started to peel them off I fell in love all over again. These are THICK quality stamps!!  They also have amazing clinging power!


I loved having the labels to show me where to put everything, so that it all fit in one case!


Case closed! Thanks Papertrey! Your stamps are true quality and you have a new customer for life! LOVE THEM!!

Review: Stampin up's UNMOUNTED stamps

I finally purchased my first UNMOUNTED set by stampin up. I was very excited that they FINALLY jumped on board the unmounted train. It saves space, is more portable, and its CHEAPER!!! I've been using stampin up stamps for many many years. Its what got me interested in stamping. Then a few years ago, they jacked up their prices, and so I moved on to unmounted stamp companies. They've recently rectified their mistake and have made stamps more reasonable again, but the real bonus is that they offer every set in unmounted for less! I like that they retained their quality rubber, and though its not see through for easier placement, you at least know that you are getting their quality (and virtually indestructible!) rubber that we all know and love.

So I have this set here, lets take a look......


Ok, first thoughts, love the case! It's a DVD style plastic case. I love that all of the stamps are not only pictured on the front, but also on the spine as well. Perfect for seeing the individual stamps when the cases are stacked. You may need to put on your reading glasses though! It's pretty tiny. 


Moving on , I opened up the case to see that they are all die cut ! Coming from the original years and years of sitting in front of the TV with my stack of new stamps hand cutting each one, I may never get over the joy of pre-cut stamps! This is of course a photo of all the left over rubber. Wish I could come up with something to do with those! 


The popped out stamps in the case. 


Now here's where things start to turn for me. See that cherry? That's a label that I put BACK. As I was looking at the stamps and reading the enclosed directions, I realized that you are supposed to stick the adhesive label right ON the cling mount. That had me worried, so I decided to start small and went with the cherry first. I peeled the label off the sheet, and applied it to the grey side of the stamp, the cling foam. I wondered, is this still going to stick to the acrylic block? My answer, not so well. Unfortunately the label doesn't have the same cling value as the cling foam. I was worried about that. In fact, Stampin up is AWARE of this, the directions clearly state to put pressure on the stamp for several seconds to get it to cling. Unfortunately the stamp just doesn't have the staying power once on there. So while it would be nice to see the actual stamp as Im using it, I'm not willing to sacrifice the quality hold on the block. So I quickly and carefuly peeled off the label and stuck it on the sheet. I'm glad I decided to start small, as I'm not so sure I could have gotten it back off with a larger image and would have been very disappointed. 


So this is what a stamp looks like without the label attached to the stamp. I'm ok with this. I already know what the stamp is, and I can see the edges just fine through the clear bock, so it's still better than trying to look through wood. :) 

So there's my review on how I prefer it. :) 

Wednesday, January 5, 2011

Gift Bag - Cold outside - Silhouette SD


One of my favorite things about the Silhouette SD is the templates for all the cute gift boxes and bags! For this project I wanted to create something using only stuff I could cut out with the silhouette. No other decorations. The following is what I came up with! the entire thing was cut out with my silhouette. From the box itself all the way down to the little letters. I will NEVER AGAIN hand cut out a single letter! That to me is worth everything!  It holds a single envelope of hot chocolate, some hershey's kisses, and a little baggie of mini marshmallows! A perfect gift for these chilly months! Isn't it cute!


until my next project! .....

Monday, January 3, 2011

3D Chandelier - Silhouette SD

My Christmas present arrived today!! I got a new Silhouette SD! My kids are just excited as I am, lol. We have big plans for lots of vinyl on the walls throught the house. It also does templates for glass etchings, iron ons, rhinestones, tattoos, and lots of other really cool stuff!


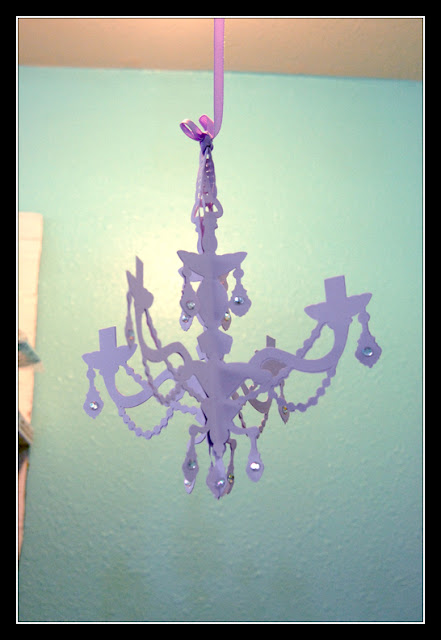
 I have been playing all day and wanted to show my first project useing my new Silhouette. I made a 3D chandelier to go in my new craft studio!  Chandeliers make me happy, yet I can't stand how much they cost! So I made one of my own! Check it out!


I cut out four copies of  Chandelier_0850 , then folded them in half and glued them together. I then stuck on pretty jewels and Whalah! a pretty chandelier that only cost me four sheets of cardstock!!


I want to make several more in different colors to hang all over my craft studio :) Stay tuned for my next creation, more than likely it will involved my new Silhouette once again! Love it!

Tuesday, December 28, 2010

My New Craft Studio

What better way to start off a craft blog then to post pics of my craft studio! Six months ago we purchased an 80 year old farm house. We've been busy doing lots of renovations since then, including building a new craft studio for me! We took what was a hall of eight closets that ajoined our bedroom, and gutted out five of them and created a new room. Here are some pictures of the process and the finished room!


Here is our hall of closets that is about to be turned into my new Craft Studio!

There is a total of 8 closets. We will be ripping out five of them. I can hear girls crying all over the country because of this. But seriously, I am NOT a girl that needs EIGHT closets!

We begin by cutting a new door into our bedroom. The old door inside the hall of closets now leads to the new bathroom and will be boarded up. The door pictured on the right also leads to the bathroom and the rest of the house and that one will be staying.

And now we have a door! or the beginnings of one anyway!

looking into the new doorway, starting to tear down the drywall

 Took the doors off the closets and knocking down drywall


looking back into the closets. The drywall is now gone!


individual closets without the drywall

now it’s time to bring down the beams for more space!

craft room before the beams came down. Thats my most wonderful Hubby, workin hard just for me!


View from the new doorway. The Beams are gone! SOO much more room! still have to rip up the beams left in the floor


There is sooo much lighting already in here! YAY!


Look at all that room! There are still three closets behind me in a small hallway. Plenty of room to store Craft and SCENTSY stuff! Now we get to finish the walls, and then paint, decorate, and organise! YAY!

Current BEFORE and AFTER demolotion Pics:

BEFORE:


AFTER:


And here's the new Craft Studio all finished & decorated!!


My daughters side I surprised her with :) its more fun when you have someone to craft with!


standing in the original doorway that is now walled up


I love my new space! hope you enjoyed the tour! :)